Light pods (3 articles)
(You should also look at the vacuum section, as it is related)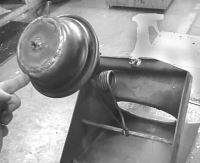
Bobbins & clearance
With the pod secured to the bobbins, there's no access to the strut. The strut must be attached to the pod before the pod is installed into the car.If the vacuum actuator is installed facing the correct direction, the spring will want to bend forward. You must force it to bend backwards (toward the wheel well) with one hand while pressing the headlight pod down into place with the other hand. Once it's all flying in loose formation, advance the two pivot bolts through the pod-bobbins and into the body-bobbins.
There should be a .040"-.060" (1.0 - 1.5 mm) gap between the body-bobbins and the pod-bobbins. Do not tighten the pod up snug to the body.
Vacuum leak (click here for diagram of how it should work !)
I knew that there was a leak somewhere in the vacuum system, I just do not know where. After tracing the leak to the headlamp cylinders, I directed my attention to the driver side first.I removed the lamp unit and peered into the opening. The solenoid valve was disconnected, though the air tubing went to the bottom of the vacuum pod as normal. I reasoned that if the pod hold pressure then it should hold vacuum. So I connected a length of hose to it and blew. It seemed to hold pressure. I then pressed the pod down and plugged the hose. Sure enough, the pod thus sealed held the lamp assembly down as it should. Good news. I replaced the light and its bezel with the screws.
The passenger side was less so. The pod obviously had a leak, as it would hold zero pressure. I remove it along with the whole light pod and found that the base of the vacuum pod around the mounting stud was totally rusted through. An obvious leak here...
I had a plate welded on the bottom of the vacuum pod being careful to not overheat the rubber bellows inside.
After the repair, it holds pressure and vaccum, as I am more than slightly surprised to report.
Next, I replaced the light pod and greased the pivot bolts etc. I bolted in the vacuum pod. I went to push down the pod, but it got about half way and THUNK. No further. It was hitting something... It turns out that the coiled spring that keeps it up has to be forceably bent backwards before putting the pod in, or it fouls the front lip of the light pod. So out it came, did it all again. Next, I was interested in connecting engine vacuum to see if these pods would go down on command. I have lost somewhere the vacuum one-way valve (anybody know a replacement easily available?), but managed to connect all the hoses anyway. Started engine.... FLicked light switch on then off...nothing.
Then I remembered: I forgot to re-connect the air hose to the the bottom of the drivers' side vacuum pod. I now have to take the light out again...grrrrrr
Pods won't go down
Q
Well, I've fitted the pods - but now they won't drop under inlet manifold vacuum pressure. I can't find any leaks on the vac system (tried both blowing and sucking - seems air tight) and the pods close manually if I push them. Is it possible that the inlet mainfold is creating insufficient pressure ? Any ideas ?A
This sounds mysteriously like a one-way-valve(CV) is in wrong, or a pod leak. System diagnostic. Follow the stream of thought. Step One; Starting with the CV's (check valves): From the intake, there is a vac nipple and a hose connected to it. There should also be one to three in-line CV's in this hose. All the CV's will pass air going towards the intake, they will not pass air going in the opposite direction (towards the pods). The end you can suck air through is the end that goes towards the intake.Step Two; Follow the hoses from each pod to the solenoid valve, if you have only one (later cars have 2). Somewhere they should join into 1 hose with a fitting of some sort. The single hose connects to one nipple on the electric solenoid valve. Another hose from the 2nd nipple on the solenoid valve will go to the intake manifold. There should be at least one CV on that hose. Manifold vacuum should pull the air out of the pods and close the lights down. The CV will prevent the loss of vacuum when the engine is off, but only if the electric valve is sealing and the pods don't leak.
Ideally, this vac hose circuit should pass through the reserve pod in the footwell, but I don't have my manual and I don't recall where everything goes. I have included a highly detailed drawing that I did with the mouse, showing components and direction of vacuum.
Step Three; Start engine. Pull hose off intake nipple. Put finger over nipple. Feel any vacuum?
Solenoid valves
The unit may be CAREFULLY taken apart, you will see inside two (2) orange coloured O rings these seal against a ball (diameter approx. 6-8 mm I forget exactly) a new set of soft O rings and a new ball will do the trick A small addition depending on which model solenoid Lotus fitted to your car.The piston travel may not be limited in stroke, this needs to be controlled, it is simple. Drill and tap a hole in the metal bridge part that prevents the piston from leaving the cylinder, and fit a screw with lock nuts
Back to Top | Back to technical index