My restoration (to date !)
Illuminating stuff - including solenoid valve fix (pictures below)
I've written out what I did so that anyone else who is a secret Lotus winker can fix their faulty solenoid valves. Please note that I only have one valve situated under my right pod, but I shouldn't think that the procedure is much different for those of you with two valves. (Twice as much work though !!)
1) Remove headlight
2) Remove pod (not essential, but useful to check the surrounding joints for air tightness and for general accessibility)
3) Remove all hoses - be careful as they are STUCK on after years of never having moved. (All my knuckles are scraped !)
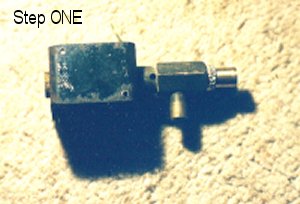
4) The solenoid valve casing is held on by two stupidly tiny self tapping screws just in front of the right front wheel. Hard to get to and seized solid through years of road crud, salt and rubber being thrown at them, use penetrating oil, carb cleaners and blow torches to loosen, persuade and gently ease them away. Ha Ha. The solenoid valve will know fall to the floor by the pod.
5) Before you go any further, confirm that the valve is actually faulty ! The way it works is this : The pods are pulled down through vacuum from the inlet manifold. (The system goes (in reverse) : inlet manifold - non return valve - vacuum tank - solenoid valve - pods) The air from the inlet manifold sucks the pods down and they stay there after the engine has been shut off through the closed vacuum system. When the engine is running, the light switches/main beam flasher activates an electrical current (that I assume is magnetic) and pulls the little piston at the rear of the valve inwards. This creates an artificial 'leak' in the system through the four little holes at the side of the valve, the vacuum goes and the pods pop up. When you release the main beam flasher or light switch, the electrical current is cut, the piston moves back, the vacuum returns and the pods are pulled down.
With me so far ?!
The reason for solenoid valve failure (in my experience) is the failure, or perishing, of the rubber seal that creates the vacuum inside the valve. This can be tested by simply sucking through one of the main valve holes (where the pipes fit) and blocking off the other one. Now blow. there should be NO air movement AT ALL. If you've just swallowed a few ounces of rubber/grit/gunge, you have just eaten what remains of the seal in your valve. Never mind, at least you know it's faulty.
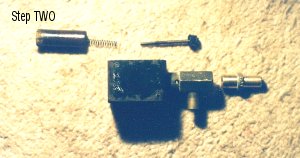
6) Clamp the valve by the casing, with the air exit (pointy) end facing upwards. If you look carefully you'll see there is a join at the shoulders of the bit where the pipe from the vacuum tank joins the hexagonal bit. This can be firmly grasped by a pair of mole grips etc. and rotated to break the seal. It should then pull out, but be careful - the metal is soft (brass ?) and chafes easily.
7) With this removed, you should be able to see a screw. This goes through the valve body and into the piston the other side, retaining it. Unscrew this, being aware that a) it is made of soft metal (I think mine was made of Plasticine) and b) it will be stuck solid through rust and years of never having been near it with so much as a sneeze, let alone an oil can. Penetrating oil, blow torches, hammers etc. to the ready again.
8) The screw withdraws through the hex. body and the piston drops out of the other side.
9) Spend the next 30 minutes looking for the spring that dropped out and flew into the corner somewhere - the one with the brown and green carpet.
10) Find it in your slipper. That you are still wearing.
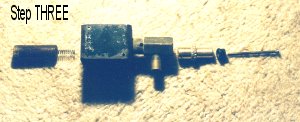
11) Now you should have the valve disassembled. Look down the hexagonal body and notice that it is two diameters - the first is large (approx. 1 cm), the second is about half that. You have to now find a piece of rubber that will fit down the first section, but BLOCK OFF COMPLETELY the second section. I'm afraid it's trial and error, but I used the little rubber bits from syringe plungers. (I'm either a Paramedic or a drug user - you decide which !) I used two rubbers from a 2.5 ml syringe and one from a 5 ml syringe, slightly cut to fit.
12) Poke a SMALL hole (with a panel pin) through the centre of each rubber and thread them on to the piston screw. Try to keep the hole as small as possible as it needs to be air tight. Thread the two smaller rubbers first, followed by the larger one. Now refit the screw and piston and test as in part 5) of this article. Still got air flow ? The rubbers aren't sealing properly. Sorry, try again ! If you get NO air flow, push the piston in - there should be a release of air. Bingo - your valve now works again !
13) BEFORE you refit the valve to your pride and joy, be aware that the piston needs to be screwed in by a certain distance. TEST that the piston depresses fully with a spare battery and two wires (I don't THINK it matters which way round they are attached). If the piston doesn't depress, turn the screw in (thereby pulling the piston in) until the piston does work fully. Otherwise you will have a perfect vacuum, but no headlight pop up facility as the piston will be unable to create a 'leak' in the system when required.
14) Re-introduce the pipe bit that you removed in section 6) of this piece. TEST that it, too, is airtight, it probably won't be. (Unless you're much luckier than me, in which case I hate you) Pull it out again and use something like bath sealant, instant gasket or instant rubber and leave it to set. Test it again.
15) You should now have a fully working solenoid valve. Refit it and happy flashing !
16) Other possible causes of valve failure :
The spring activating the piston that moves when you pull the light switch may have rusted away or gone 'ping' somewhere. Replace it. Your valve is otherwise useless.
There is a leak around the (unofficially) 'detachable' part of the valve where the pipe from the vacuum tank joins. Bath sealant, instant gasket, instant rubber, will usually work.
Back to restoration index | Back to Top | Back to how I bought the car